Tuesday, June 29, 2010

Branson Vacation


We are having a great time on vacation in Branson.  We arrived Sunday evening and went out for yummy pizza, after checking in to our condo on Tablerock Lake. 
We spent Monday on the lake.  We rented a boat and the kids enjoyed tubing, skiing, and wake boarding.  Byron did ski a little, but he mostly let the kids have their fun.  I was the official photographer and kept everyone lathered with sunscreen.

Byron and Brandon have each water skied before, but the other three kids have only snow skied. After about an hour of tubing, they were ready to get the skis out. Brandon went first, since he already knew how. Here he is wake boarding.

 Once Brandon had some skiing out of his system, it was time for ski school!

 It was a blast watching them learn.  They are all three so different. Their individual personality traits really show when it's time to learn something new and challenging.

First Ellyn gave it a try.  It took her a few times, but she never gave up.
She was determined to do it and knew it would be so fun once she had it figured out. She had a great time the rest of the day.


Ryan tried next and had trouble just keeping his body/equipment in the right position to even get started. Brandon was in the water to help him, but he was frustrated and refused to try after the first failed attempt.  His smile here is not representative of how the learning session really went.


Meggan went last and was nervous but motivated. Brandon helped her and she got up the first try.  We weren't surprised that it came easily for her, but I think she was. 

Ryan decided he had to give it another try (yay!), and got up right away.  He always takes a little longer to warm up to new things.  I was really proud of him for trying again.  He ended up having a lot of fun!


Here are my sunkissed darlings:

Tuesday, June 22, 2010

"While You Were Out" Bedroom Makeover--Success!!!

We just revealed Meggan's bedroom to her this evening and she loved it.

Here are the pictures:

Meggan's first look at the room.  We stenciled one wall with a zebra print.

Beautiful bed...we painted an antique door and bought and sewed pillows. Comforter was on clearance at Bed, Bath & Beyond.  The lamp is from Target; paper lanterns from K-Mart. The pictures of Meggan were taken by Jenna and Ellyn.

The bookshelf is from Target.  Meggan always wanted a bird, so the little birdcage on top has a fake bird in it.  Meggan used to disco in the silver platform sandals on the bottom shelf.

The table is from an auction and was painted white by Jenna and Ellyn. The cute red clock is from Target; pegboard is $6 from Lowes, then painted.  There's a goldfish swimming around in the hanging bowl on the left.

Meggan's silhouette was done by Ellyn.  The red heels were purchased by Meggan at a garage sale.  (She wears them occasionally with a black strapless formal.)

Black bins are from Target.
Paint colors are Kilim Beige from Sherwin Williams on the walls, the door is Animated Coral from Sherwin Williams.  The pegboard was painted Asparagus from Lowes. A few random blue things were painted Sprinkler from Lowes.

Happy Birthday, Meggan!

Monday, June 21, 2010

Is there an animal in your bedroom?

There seems to be an animal presence in your bedroom, Meggan.  It's a good thing you're an animal lover.

Sunday, June 20, 2010

More hints for Meggan

Dear Meggan,
While you have been away at Gramma's for your "while you were out" room makeover, we have had some decisions to make--lots of decisions to make!

We have decided to have you help us choose the paint color for one of the items we are painting for your bedroom.

Which color do you prefer?
asparagus or sprinkler

(Jenna and Ellyn vote for asparagus and I (mom) vote for sprinkler.)


And the second hint for you:

We haven't decided yet what is going to happen to this wall...
but we know that it will not be painted tan like the rest of the room.

We can't wait for the bedroom to be finished, so that we can show it to you on your birthday.
lots of love!
Mom, Ellyn, and Jenna

Friday, June 18, 2010

"While You Were Out" Bedroom Makeover -- part 1

My youngest child is turning ten years old next week. Yes! My baby will be ten!
Apparently when Meggan was five or six (which seems like last week), I promised her a bedroom makeover when she turned ten.
I can't believe it came so quickly. I love this beautiful girl so much!


For more than six months, Meg has talked about re-doing her room, and my 15-yr-old daughter and her friend started making plans for a "while you were out" makeover.  Meggan determined that she wanted the makeover for her birthday gift.  So while Meggan is staying with Gramma for a few days, we are painting and sewing and shopping.

I can't really recommend doing a bedroom makeover during an addition/remodel of a kitchen, dining, and family room. It seems that since the bedroom isn't a part of that remodel process, maybe a family would want to leave the unaffected rooms intact--in order to keep their sanity.  However, this bedroom makeover/ birthday gift was planned long before the addition/remodel, so we are living in a little more chaos because of it.

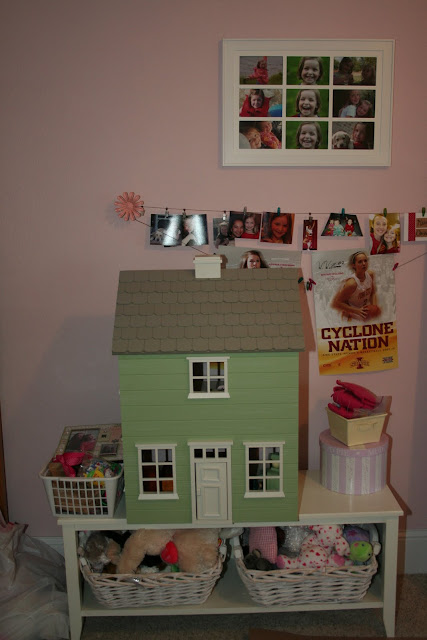
Here are a few before pictures of Meg's bedroom. (I forgot to take before pics until it was partially cleared.) Really, there was a LOT more stuff in this room before I shot these pictures.


I am pretty disappointed that I will no longer have a "little girl" bedroom in my house.  I think every home needs a bedroom with a child-sized table and chairs,  a doll house, and a border of yellow and pink flowers painted along the top of the wall.  Since my girl is growing up, some of those things will be going into storage.  I plan to use them again one day...

Here are some peeks into the room makeover for Meggan and Gramma to see:


More photos later, we are too busy painting and sewing to spend much time blogging!

Tuesday, June 15, 2010

Addition/Remodel update -- week 6

I had lots of fun watching my kitchen progress last week.
We painted the walls Camelback from Sherwin-Williams. Most of my house is painted a color off of that paint strip.
The cabinets are all in now and the counter top measure is today.

My mudroom looked like this last week:
My mudroom has two closets--the one you see above and a second one that has been a pantry for the past 15 years.
Since my new pantries for the kitchen were installed, I was able to move things into them.  This emptied the  mudroom pantry and freed it up for mudroom things like shoes and gym bags.  It was a relief to tame the mudroom clutter and get the stuff behind closed doors.  It still has a lot of tools and construction equipment in it, but we can walk through a little more easily now.
The past weekend was rainy, so we spent Saturday vacuuming out cabinets and putting in the shelves.
Here's a look at the new pantry:


We have a delivery date next week for the appliances and a date for the countertop installation the following week.  The kitchen is nearing completion. It should be mostly finished by the end of June.
Then I can brace myself for the rest of the remodel/addition process.

Thursday, June 10, 2010

Summertime...and the living is easy

 I'm not sure which of the two was more content, Ryan or Mandie. 
 I loved gazing at them.

Monday, June 7, 2010

Addition/Remodel update -- week 5

The new kitchen has drywall up.


The cabinets got delivered this past week!  I can't wait to fill them up with my kitchen goodies.

Thursday, June 3, 2010

Hatching Monarch Butterflies at Home

I spotted this beauty on my milkweed--the first one I've spotted this season.

 The spotting of the first monarch is a symbol of the beginning of summer at my house.  Much like spotting a robin signifies spring has arrived.  I will spend the next four months checking milkweed leaves for eggs...obsessively.  My oldest and youngest children, Brandon and Meggan, will do the same.  We have hatched monarch butterflies for over ten years, and never tire of the wonder of it.
You might remember this post from last fall about our butterflies.

If you are interested in hatching monarchs, here is the "need to know" list:

The life cycle is less than one month, which makes it a great short-term science project.

You will need a large pickle jar or something similar to create its habitat.  I have found plastic jars in the kitchen containers at Walmart/Target that work well.  I cover the opening with screen or netting and a rubber band sometimes.

Feed only milkweed--you will find it in lots of road ditches and open fields.  It is the only food the caterpillar eats, so you will need a supply of it--a fresh leaf daily, and 2-3 at the end when the caterpillar is huge.
Check the backs of milkweed leaves for tiny eggs or tiny caterpillars, typically only a few per milkweed plant.  Sometimes more, sometimes none. The eggs look exactly like a chicken egg--creamy white and oval, except tiny.  The caterpillars start so tiny that it's almost easier to see where they have eaten the leaf, rather than the caterpillar themselves; but they grow very quickly.  Pick the leaf with the egg or caterpillar.  You can put a stem of milkweed in a glass of water to have a supply for a day or two.  Very carefully transfer the caterpillar to the new leaf each day and throw out the old leaf--it will get moldy if left in the jar.
The eggs will usually hatch within 24 hours, assuming they are going to hatch.  The baby caterpillars will eat milkweed and double in size almost daily.  They will eat/grow for around 14 days.  When they are molting (shedding their skin) they will stop eating and not move very much.  This happens a few times during the 14 days.  By the end of the 14 days, the caterpillar will almost be as long as a child's pinky finger.


Sometime during the two weeks, put a stick into the jar for it to make the chrysalis on. The stick needs to have horizontal twigs.  Sometimes it makes the chrysalis on the lid or the side of the jar, even if there is a stick.  When it is done eating and ready to make the chrysalis, it will crawl all over the jar looking for the right spot.  Then it will attach itself  and hang upside down in a J.  Now you don't have to feed it anymore!

The chrysalis is amazing!  Watching the caterpillar change to a chrysalis is even more amazing, and we have only seen it happen a handful of times.

It will hang for approximately 12 days.  When it is almost ready to hatch, the chrysalis will become black and see-through.

Once the butterfly hatches, it will hang upside down and dry for several hours.  This is usually when we move it outside to the porch to watch.  You can see the liquid drip off the wings as they dry and the wings slowly uncurl.

After a while, it will begin fanning its wings.

  Then it will be ready to fly away!